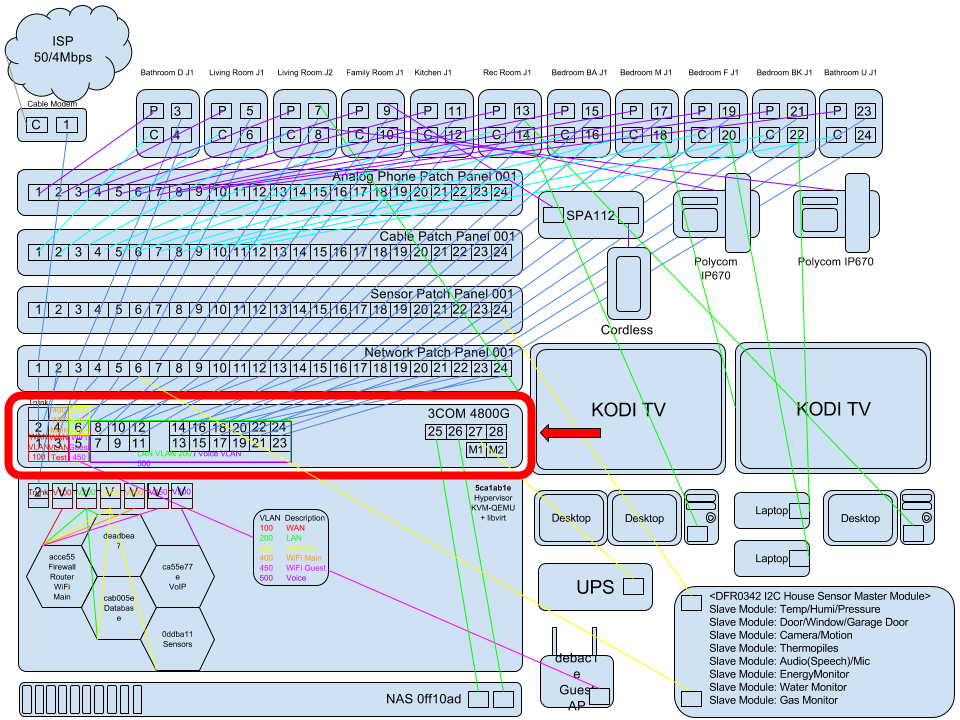
Arch Linux Infrastructure - Brouter Inception - Part 1 - Network Switch VLANs

Index
Part 01 - Network Switch VLANs - You Are Here!
Part 02 - Hypervisor OS Install
Part 08 - NFTables Transparent TOR Proxy / SSH / IRC
Switch Hardware
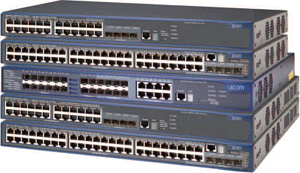
Switch H3C 4800G PWR 24-port

Switch 4800G PWR 24-port
24 10/100/1000 Mb/s with 4 SFP combo interfaces
10/100/1000 ports with 15.4 W per port maximum; 370 W total PoE power budget without supplemental RPS power
144 Gb/s full duplex switching capacity
107.2 Mp/s forwarding rate
2 expansion slots each supporting up to 2 10-Gigabit interfaces
10BASE-T/100BASE-TX/1000BASE-T ports configured as auto-MDI/MDIX
Stacking performance with CX4 local connection, each port operates at 12 Gb/s, or 24 Gb/s full duplex. Total bandwidth is 48 Gb/s using two ports per switch, or 96 Gb/s using four ports per switch.
Wirespeed performance across ports
Store-and-forward switching
Latency < 10 μ
Dimensions (H x W x D)
Height: 43.6 mm (1.7 in or 1 RU)
Width: 440.0 mm (17.4 in)
Depth: 24 and 48-port PWR: 420.0 mm (16.5 in)
Weight Switch 4800G PWR 24-port: 6.0 kg (13.2 lbs)
AC Rated voltage range 100 - 240 V, 50 - 60 Hz
DC-rated voltage range (for RPS) Switch 4800G PWR24-port: -52 to -55
Power consumption (max) Switch 4800G PWR 24-port: 93 W, plus up to 370 W for PoE
Operating temperature 0° to 45°C (32° to 113°F)
Operating humidity 10% to 90% non-condensing
Heat dissipation (max) Switch 4800G PWR 24-port: 316 BTU/hr; excludes heat from PoE
Reliability 24-port PWR: 44 yrs (389,000 hrs)
Firmware: Download
Version as of writing:
5500.EI-4800G_5.20.R2221P18-US (TAA Compliant)	28-Sep-2015	23-Oct-2015	Release notes 18.7 MB
5500.EI_5.20.R2222P05	24-Apr-2017	26-Apr-2017	Release notes 17.0 MB

BootROM: A5500EI-BTM-721-US.btm
Boot-Loader: A5500EI-CMW520-R2222P05.bin
You may need to grab both lastest downloads as the bootrom is only in the prior release, you can use the newest boot-loader with it though, don’t have to first use the older boot-loader *.bin file.
Factory Reset
Forgot your login password and want to do a password recovery? Factory reset to default!
In order to restore your 3COM switch you will need the following:
Serial Console Cable
1.) Connect to the console port of the switch.
Make sure to connect using the following settings 19200, 8, 1, N
2.) Press Ctrl-B to enter the boot menu.
Starting......

    *************************************************************************
    *                                                                       *
    *             Switch 4800G PWR 24-Port BOOTROM, Version 721             *
    *                                                                       *
    *************************************************************************
    Copyright(c) 2004-2014 3Com Corp. and its licensors. All rights reserved.
    Creation date   : Mar 14 2014, 12:12:47
    CPU Clock Speed : 533MHz
    BUS Clock Speed : 133MHz
    Memory Size     : 256MB
    Mac Address     : 001ec1dcff80


Press Ctrl-B to enter Boot Menu... 1
3.) Enter 7 to skip current configuration file.
When prompted for password just hit enter.
password:

  BOOT  MENU

1. Download application file to flash
2. Select application file to boot
3. Display all files in flash
4. Delete file from flash
5. Modify bootrom password
6. Enter bootrom upgrade menu
7. Skip current configuration file
8. Set bootrom password recovery
9. Set switch startup mode
0. Reboot

Enter your choice(0-9): 7

The current setting will boot with current configuration file when rebooted.
Are you sure you want to skip the current configuration file when rebooting? Yes or No(Y/N)y

Setting......done!
Hit Y to continue
4.) Enter 0 to reboot.
Enter your choice(0-9): 0

System is rebooting...
5.) Once booted, delete the 3comoscfg.cfg file.
You can either backup the config file first then delete, or delete it.
<4800G>dir flash:/
Directory of flash:/

   0(b)  -rw-  10319701  Apr 30 2008 09:44:16   someoldversion.bin
   1     -rw-      5827  Jun 13 2017 00:50:06   3comoscfg.cfg
   2(*)  -rw-  14379886  Apr 26 2000 13:09:50   a5500ei-cmw520-r2222p05.bin
   3     -rw-    484116  Apr 26 2000 12:07:55   a5500ei-btm-721-us.btm
   4     drw-         -  Apr 26 2000 12:00:38   seclog
   5     -rw-       151  Jun 13 2017 00:50:00   system.xml

31496 KB total (6885 KB free)

(*) -with main attribute   (b) -with backup attribute
(*b) -with both main and backup attribute
Delete configuration file
delete 3comoscfg.cfg
Delete flash:/3comoscfg.cfg?[Y/N]:y
.......
%Delete file flash:/3comoscfg.cfg...Done.
6.) Reboot and you’re done!
reboot
Factory U/P
U:admin
P:
Firmware Updates
FTP Method
1.) Get the files to the switch by using FTP.
<4800G> ftp 10.13.37.100
Trying ...
Press CTRL+K to abort
Connected.
220 WFTPD 2.0 service (by Texas Imperial Software) ready for new user
User(none):user
331 Give me your password, please
Password:
230 Logged in successfully
[ftp] get A5500EI-CMW520-R2222P05.bin
[ftp] get A5500EI-BTM-721-US.btm
[ftp] bye
2.) Upgrade Boot ROM.
<4800G> bootrom update file A5500EI-BTM-721-US.btm
This command will update bootrom file on the specified board(s), Continue? [Y/N]y
Now updating bootrom, please wait...
Succeeded to update bootrom of Board
3a.) Load the system software image and specify the file as the main file at the next reboot.
<4800G> boot-loader file A5500EI-CMW520-R2222P05.bin main
This command will set the boot file. Continue? [Y/N]: y
The specified file will be used as the main boot file at the next reboot!
3b.) You can then set the old bootloader to backup in case it fails if you didn’t delete it for space.
<4800G> boot-loader file someoldversion.bin backup
 This command will set the boot file. Continue? [Y/N]:y
 The specified file will be used as the backup boot file at the next reboot!
<4800G> display boot-loader
The current boot app is: flash:/someoldversion.bin
The main boot app is: flash:/A5500EI-CMW520-R2222P05.bin
The backup boot app is: flash:/someoldversion.bin
4.) Reboot the switch with the reboot command to complete the upgrade.
reboot
TFTP Method
TFTP is basically the same
<4800G>tftp 10.13.37.100 get A5500EI-CMW520-R2222P05.bin
<4800G>tftp 10.13.37.100 get A5500EI-BTM-721-US.btm
 ...
 File will be transferred in binary mode
 Downloading file from remote TFTP server, please wait............../
<4800G>boot-loader file A5500EI-CMW520-R2222P05.bin main
 This command will set the boot file. Continue? [Y/N]:y
 The specified file will be used as the main boot file at the next reboot!
You can then set the old bootloader to backup in case it fails if you didn’t delete it for space.
<4800G>boot-loader file someoldversion.bin backup
 This command will set the boot file. Continue? [Y/N]:y
 The specified file will be used as the backup boot file at the next reboot!
reboot
 Start to check configuration with next startup configuration file, please wait........DONE!
This command will reboot the device. Current configuration will be lost in nex startup if you continue. Continue? [Y/N]:
Running…
Software Version
S4800G-CMW520-R2210-S168

Hardware Version
REV.C

Bootrom Version
721

Running Time:
0 days 0 hours 1 minutes 46 seconds
Switch Configuration
<4800G>system-view
[4800G]
[4800G]sysname HQ
[4800G]clock timezone "Eastern Time(US,Canada)" minus 05:00:00
[4800G]ssh server enable
[4800G]user-interface aux 0
[4800G ... ] authentication-mode scheme
[4800G]user-interface vty 0 15
[4800G ... ]authentication-mode scheme
Setup VLAN
The primary two ports on the switch we need to setup are ports 1/0/1 and 1/0/2, 1/0/1 is the WAN port untagged vlan 500 and 1/0/2 is the trunk port for the hypervisor one of the required VLANs for it is 600 for general LAN traffic. The rest of the VLANs are for virtual machines (PBX, Automation, etc) which will be connected by virtual bridges. Port 1/0/3 is our emergency test port for the WAN, Unplug trunk and plug in a test machine to see if the WAN is functioning properly.
<4800G>system-view
System View: return to User View with Ctrl+Z.
[4800G]vlan 100
[4800G-vlan100]description WAN 0100 VLAN
[4800G-vlan100]port GigabitEthernet 1/0/1 to GigabitEthernet 1/0/3
[4800G-vlan100]vlan 200
[4800G-vlan200]description LAN 0200 VLAN
[4800G-vlan200]port GigabitEthernet 1/0/4 to GigabitEthernet 1/0/24
[4800G-vlan200]vlan 222
[4800G-vlan222]description Default 0222 VLAN
[4800G-vlan222]vlan 300
[4800G-vlan300]description Automation 0300 VLAN
[4800G-vlan300]vlan 400
[4800G-vlan400]description WiFi 0400 VLAN
[4800G-vlan400]vlan 450
[4800G-vlan450]description Guest Wifi 0450 VLAN
[4800G-vlan450]vlan 555
[4800G-vlan555]description TOR 0555 VLAN
[4800G-vlan555]vlan 500
[4800G-vlan500]description VOIP 0500 VLAN
[4800G-vlan500]quit
[4800G]voice vlan 500 enable
[4800G]interface GigabitEthernet 1/0/4 to 1/0/24
voice vlan enable
[4800G]save
The current configuration will be written to the device. Are you sure? [Y/N]:y
Please input the file name(*.cfg)[flash:/3comoscfg.cfg]
(To leave the existing filename unchanged, press the enter key):
flash:/3comoscfg.cfg exists, overwrite? [Y/N]:y
Validating file. Please wait...................
The current configuration is saved to the active main board successfully.
Configuration is saved to device successfully.
How to enable Web Interface
Check if web interface is running
<4800G>display ip http
HTTP port: 80
Basic ACL: 0
Operation status: Stopped
Go to system-view to change settings
<4800G>system-view
System View: return to User View with Ctrl+Z.
Enable web interface
[4800G]ip http enable
Check if web interface is running now
[4800G]display ip http
HTTP port: 80
Basic ACL: 0
Current connection: 0
Operation status: Running
Add User Account
Setup a master user account with all the access lan-access, ssh, portal, web. Set the access vlan to our wan vlan of 200, you might want to change this to a “Maintenance” VLAN so nobody on the general network has access to your switch interface.
[4800G]local-user pleb
password cipher plebmast0r
authorization-attribute level 3
authorization-attribute vlan 200
service-type lan-access
service-type ssh
service-type portal
service-type web
save
The current configuration will be written to the device. Are you sure? [Y/N]:y
Please input the file name(*.cfg)[flash:/3comoscfg.cfg]
(To leave the existing filename unchanged, press the enter key):
Validating file. Please wait..................
The current configuration is saved to the active main board successfully.
Configuration is saved to device successfully.
return
Setup interface IP
Setup an interface IP address so you can access the switch remotely over the network.
<4800G>system-view
System View: return to User View with Ctrl+Z.
LAN access interface to switch
interface vlan 200
ip address 10.0.1.2 255.255.255.0
ip route-static 0.0.0.0 0.0.0.0 10.0.0.1
quit
Wireless access interface to switch
[4800G]interface vlan 400
ip address 10.13.37.2 255.255.255.0
ip route-static 0.0.0.0 0.0.0.0 10.13.37.1
quit
save
Setup Voice
 voice vlan mac-address 0004-f200-0000 mask ffff-ff00-0000 description Polycom Large
 voice vlan mac-address 0041-d200-0000 mask ffff-ff00-0000 description Cisco 78xx
 undo voice vlan security enable
Setup WAN port (ISP Internet connection port Cable Modem, DSL, Fiber,etc)
[4800G]interface GigabitEthernet1/0/1
[4800G-GigabitEthernet1/0/1]port link-mode bridge
[4800G-GigabitEthernet1/0/1]port access vlan 100
[4800G-GigabitEthernet1/0/1]broadcast-suppression pps 3000
[4800G-GigabitEthernet1/0/1]undo jumboframe enable
[4800G-GigabitEthernet1/0/1]stp edged-port enable
[4800G-GigabitEthernet1/0/1]quit
Setup Trunk port ( Hypervisor Port )
[4800G]interface GigabitEthernet 1/0/2
[4800G-GigabitEthernet1/0/2]port link-mode bridge
[4800G-GigabitEthernet1/0/2]port link-type trunk
[4800G-GigabitEthernet1/0/2]undo port trunk permit vlan 1
[4800G-GigabitEthernet1/0/2]port trunk permit vlan 100 200 222 300 400 450 555 500
[4800G-GigabitEthernet1/0/2]port trunk pvid vlan 222
[4800G-GigabitEthernet1/0/2]broadcast-suppression pps 3000
[4800G-GigabitEthernet1/0/2]undo jumboframe enable
[4800G-GigabitEthernet1/0/2]stp edged-port enable
[4800G-GigabitEthernet1/0/2]quit
Setup WAN Test port
[4800G]interface GigabitEthernet1/0/3
[4800G-GigabitEthernet1/0/3]port link-mode bridge
[4800G-GigabitEthernet1/0/3]port access vlan 100
[4800G-GigabitEthernet1/0/3]broadcast-suppression pps 3000
[4800G-GigabitEthernet1/0/3]undo jumboframe enable
[4800G-GigabitEthernet1/0/3]stp edged-port enable
Setup WiFi Main & Guest Access Point Port
If AP does multi SSID’s
[4800G]interface GigabitEthernet1/0/4
[4800G-GigabitEthernet1/0/4]port link-mode bridge
[4800G-GigabitEthernet1/0/4]port link-type hybrid
[4800G-GigabitEthernet1/0/4]undo port hybrid vlan 1
[4800G-GigabitEthernet1/0/4]port hybrid vlan 400 450 tagged
[4800G-GigabitEthernet1/0/4]port hybrid vlan 200 untagged
[4800G-GigabitEthernet1/0/4]port hybrid pvid vlan 200
[4800G-GigabitEthernet1/0/4]broadcast-suppression pps 3000
[4800G-GigabitEthernet1/0/4]undo jumboframe enable
[4800G-GigabitEthernet1/0/4]poe enable
[4800G-GigabitEthernet1/0/4]stp edged-port enable
If 2 Hardware AP’s are required (no multi SSID support)
Main Access Point Port
[4800G]interface GigabitEthernet1/0/4
[4800G-GigabitEthernet1/0/4]port link-mode bridge
[4800G-GigabitEthernet1/0/4]port link-type hybrid
[4800G-GigabitEthernet1/0/4]undo port hybrid vlan 1
[4800G-GigabitEthernet1/0/4]port access vlan 400 tagged
[4800G-GigabitEthernet1/0/4]port hybrid vlan 200 untagged
[4800G-GigabitEthernet1/0/4]port hybrid pvid vlan 200
[4800G-GigabitEthernet1/0/4]broadcast-suppression pps 3000
[4800G-GigabitEthernet1/0/4]undo jumboframe enable
[4800G-GigabitEthernet1/0/4]poe enable
[4800G-GigabitEthernet1/0/4]stp edged-port enable
Guest Access Point Port
[4800G]interface GigabitEthernet1/0/5
[4800G-GigabitEthernet1/0/5]port link-mode bridge
[4800G-GigabitEthernet1/0/5]port access vlan 450 tagged
[4800G-GigabitEthernet1/0/5]port hybrid vlan 200 untagged
[4800G-GigabitEthernet1/0/5]port hybrid pvid vlan 200
[4800G-GigabitEthernet1/0/5]broadcast-suppression pps 3000
[4800G-GigabitEthernet1/0/5]undo jumboframe enable
[4800G-GigabitEthernet1/0/5]poe enable
[4800G-GigabitEthernet1/0/5]stp edged-port enable
Add rest of the ports to LAN VLAN 200
interface range GigabitEthernet1/0/6 to GigabitEthernet1/0/24
port link-mode bridge
port link-type hybrid
undo port hybrid vlan 1
port hybrid vlan 200 untagged
port hybrid pvid vlan 200
voice vlan 600 enable
broadcast-suppression pps 3000
undo jumboframe enable
stp edged-port enable
Continue to Part 02 - Hypervisor OS Install